When doing any finish carpentry work, it is essential to become proficient at making neat and strong joints.

Butt joints: 2 ends butted to form a right angle; Half-lap joint;
Full-lap joint

Cutting a lap joint with hand tools: 1. Mark edges of cuts while
holding boards together or by measuring; 2. Draw cutting lines accurately
using a square; 3. Saw the cross grain cut; 4. Remove the waste by
sawing with the grain.
Butt joints -- When the plain edge of one board is attached to the plain edge or side of another board, the joint is called a butt joint. Boards are held together with screws, bolts, or nails and glue.
Lap joints -- These are fairly simple but strong and attractive joints.
Full-lap -- The overlapped board is notched deep enough to accept the entire thickness of the lapping board. Never cut the notch more than one third the thickness of the board, otherwise the joint will be weak. Instead, use a heavier board or a half-lap joint.
Half-lap -- This is the same as the full-lap joint except that both boards are notched. Cutting a lap joint with hand tools
Dado and rabbet joints
Much more stable than the butt joint, the dado joint is distinguished by the way that the plain edge of one board fits into a milled slot on the second board. Nails or screws and glue secure this joint. When the milled slot is placed midway in a board, it is a dado; when the slot is at the end of a board, it is a rabbet. A slot running with the grain is called a groove.
Use a router or a dado blade in your power saw to cut the appropriate shapes. To disguise the presence of a dado, cabinetmakers sometimes modify the joint as shown. The resulting joint—a stopped dado—looks like a butt joint when completed.

Plain dado joint; Rabbet joint: Leave at least ½-inch
thickness for strong joint Mark and cut rabbet with a saw and chisel.

Stopped dado joint: Notch same length as stop; Cutting
a stopped dado or groove: With flat side of chisel to line, remove 1”
of waste at stopped end; then saw.

Cutting a dado or groove: 2. Cut sides of the dado to
the depth of the guide board; 3. Sides of groove, even ones longer than
the saw, can be cut accurately by clamping on a guide board; 4. With
beveled side up, remove most of waste. With beveled side down, smooth
out bottom of dado.
Miter joints -- This is a particularly neat way to make two pieces of wood fit together forming a right angle.
It is recommended that you cut the pieces in a miter box, although it is possible, with a lot of care, to cut a freehand miter. Strengthen these joints with glue and finishing nails, screws, or fasteners.
Doweled joints -- Often these joints start out as simple butt joints, then dowels or splines are fitted into the pieces to increase strength. Always glue these joints.
If possible drill or cut both boards at the same time to ensure that the dowels or splines will slide in easily.
Dovetail joints -- True dovetails are carefully laid out and cut by hand, but a joint with a similar appearance can be created much faster using a special bit in the router and a dovetail jig.

Miter joint; Fastening options: Glue and finishing nails;
fasteners; Screw or dowels; Dovetail joint; Dovetail template

Dowel joint

Marking dowel holes without a doweling jig: 1. Hold pieces
together and mark across the joint where dowels will go; 2. Carry
lines across edges using a square; 3. Measure precisely from edges
to where holes will be drilled.
Mortise-and-tenon joints -- When done properly, these joints are almost invisible and very strong. You must measure carefully, then chisel out the mortise and make several cuts to create the tenon.
Make the tenon first, then cut the mortise to fit. The tenon should be one third the thickness of the board cut to a depth determined by the thickness of the board that is being mortised.
Tongue-and-groove joints -- These are simpler versions of the mortise-and-tenon joints but equally strong. Instead of having to cut out a mortise with a chisel, you cut a groove with a saw.
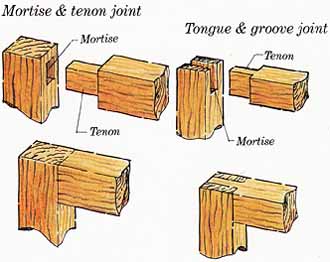
Mortise & tenon joint; Tongue & groove joint
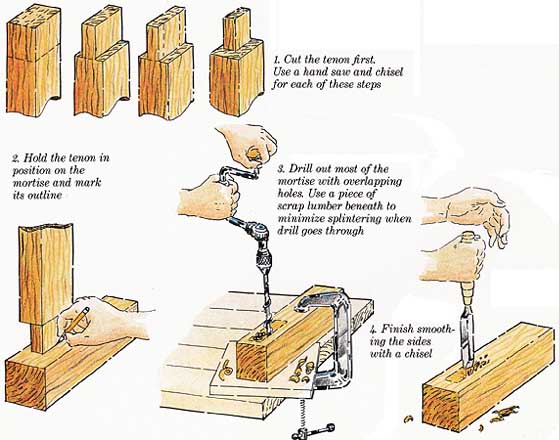
Cutting a mortise & tenon with hand tools: 1. Cut the
tenon first. Use a hand saw and chisel for each of these steps. 2.
Hold the tenon in position on the mortise and mark its outline. 3.
Drill out most of the mortise with overlapping holes. Use a piece
of scrap lumber beneath to minimize splintering when drill goes through.
4. Finish smoothing the sides with a chisel.
Prev.: Adhesives
Next: Building Techniques
Full guide: How to Plan & Build Bookcases, Cabinets & Shelves
