The first law of backpacking is, you must carry everything. Since your pack must not be too heavy or bulky, what you carry must be carefully and thoughtfully planned. Your equipment must be right and light. For your first trip, you might well spend twelve hours packing things, using a checklist that is complete down to “pants,” as if you might walk out the door not wearing any. If you get pleasure out of careful preparation, you will also spend a lot of time preparing. And if you do that, you will be able to spend two weeks in the back country with plenty of food, clothing and shelter, and maybe with a few luxuries to reward you for your effort. Other people can’t wait so long to get going, and they sometimes forget something, but it never seems to be any thing they absolutely can’t do without.
If you have been camping, you already own some equipment that is usable for backpacking. Maybe later you will want to re place some things with lighter or better versions. For now, save your money for the backpacking gear you will need right away.
The most expensive items of gear—as distinguished from clothing—are: boots, pack, sleeping bag and tent. The first three you need on every trip; the last you need on some.
Boots
Your feet have to carry both you and your pack, so be nice to them. They will be happy in a good pair of leather or leather-and- cloth boots. Tennis shoes and running shoes are not sturdy enough for wilderness trails, and at stream crossings and in wet meadows they immediately get soaked.
Good boots are not heavy boots. The U.S. Army Research Institute of Environmental Medicine found that it takes more than six times as much energy to carry a pound on your feet as on your back. In other words, saving a pound in the weight of your boots is just as good as removing six pounds from your pack.
Good hiking boots, ones that are sturdy enough for backpacking, can be expensive—over $100. The uppers should be leather or a combination of leather and fabric (like cordura, a very durable kind of nylon). They should cover your ankles, for stability. The more rugged the terrain you plan to hike in and the heavier your pack, the fewer seams, the thicker leather and the less fabric you’ll want. Comfort is important, of course, so don’t buy a boot stiffer or heavier than you will need. The soles should be of car bon-rubber, not leather (too slippery) or crepe or neoprene (not tough enough).
The fit of boots in any given size varies substantially from company to company. Try on a variety of boots from different manufacturers to determine which last (the form the boot is constructed on) feels best for you. If possible, try on boots toward the end of the day, when your feet will have swelled a bit from the day’s activities.
Wear the socks you plan to wear on the trail. First check the boots’ arch area to see that there is a solid shank to reinforce the curve of the arch. Then press down on the toe to make sure that it too is reinforced; a soft toe invites hurt feet. The back of the boot, around the heel, should also be reinforced to protect against impact and to keep your heel in place inside the boot. Put your foot in the boot, unlaced, and slide your toes forward until they touch the toe of the boot. There should just be room for your forefinger inside the boot behind your heel. Now lace the boots firmly and stand up. Wiggle your toes. They should not touch the end of the boot. The back of the boot should feel fairly snug around your heel. When you lift your heel, it may slide up a bit inside the boot, but once the boot is broken in, it should not. If the fit is right, the widest part of the boot will be about at the ball of your foot. (If you have very long toes, you will have to fit for length, rather than for position of the ball of your foot.)
The final store test is to stand on a sloping surface; facing down slope, to check that your foot does not slide forward and press your toes against the end of the boot.
Having bought your boots, walk in them for a few days to break them in before you begin your trip.
Thick wool socks provide cushioning and warmth, and soak up sweat well. A thinner pair of polypro, cotton or silk worn in side these is a great defense against blisters. (Section 10 discusses the blister problem.)
The Pack
Backpacks underwent a revolution right after World War II, with the invention of the contoured aluminum pack-frame. Properly packed, this rig puts most of the pack’s weight on the hips and keeps the rest of the weight close to the body, almost over the body’s center of gravity. (The same is true of packs with internal frames, which are discussed below under the heading “Internal-frame packs.”) If your other gear is fairly heavy, you really need a good pack.
What frame you choose depends on—besides cost—your size. The fit of the frame is very important: an ill-fitting frame will be less comfortable with a 30-pound load than a well-fitting frame with a 40-pound load. When you put on an empty pack, the shoulder-strap attachments to the frame should be about one inch higher than where the straps cross your shoulders, and the band that goes across your lower back should be just below the point where your back starts to curve outward toward your rump. Obviously, this band must rest on the outward-sloping part of your back if it is to put most of the pack’s weight on your pelvis rather than on your shoulders. (The position of the band is adjustable, within limits, on most frames, and some recent designs have a way to adjust one frame for any size adult.) When you add weight to the pack, the points I described will be about an inch lower.
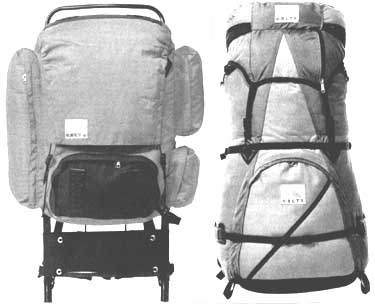
Fig 2-1: External-frame pack (left); Internal-frame pack (right)
The transfer of weight to the pelvis is performed by a hip belt— sometimes two separate straps, one attached to the bottom of each side of the frame, but more often a fully encircling belt attached to the frame in several places. This arrangement forms a tight circle that transfers most of the pack’s weight onto the hip bones. Most hip belts are padded for comfort. Separate slip-on hip pads are available if you find that the hip belt cuts into your hips.
Some pack-frame designs have metal extending forward from the bottom of each side of the frame, and a wraparound belt attached to this metal at each side of your pelvis. This design allows the wraparound belt to pivot independently of the rest of the frame, and I find that more comfortable.
Whatever kind of belt you have, the way to tighten it is to first hunch up your shoulders as high as you can, or have someone lift your pack, and then tighten the belt as much as you can around the top of your hip bones without making your belly uncomfortable. The circle formed by the hip belt and the back band or by the wraparound belt should be horizontal—that is, parallel to the ground—and it should be just below the tops of your hipbones. When selecting a pack for fit, put some weight in the pack and make these tests with the belt. If the belt works loose when you walk, the buckle is faulty or you have threaded the belt through the buckle incorrectly.
Some metal packframes have a curved bar across the top, attached to the vertical sidebars or continuous with them. The bar aids in attaching things at the top of the pack. The bar also keeps the packbag away from your head. Depending on your body build and your posture, you may need such a bar. Without it, your packbag may push your head forward and thus strain your neck, to say nothing of knocking your hat off from time to time.
If you have the right-size pack and a properly fitting hip belt, almost no weight will be on your shoulders unless you choose to put some there by loosening the belt a little and tightening the shoulder straps a little. With nearly all the weight on your hips, your shoulder straps will merely keep the pack from falling back ward.
Considering the cost of a packframe and bag, you might borrow or rent an outfit of the kind and size you think you prefer before buying.
Choose a packbag that will hold as much as you want to carry, and has enough pockets to suit you. I like as many pockets as I can get, because they allow me to put first aid here, fishing gear there, and lunch someplace else. Lots of pockets also help me find things in the dark. I also prefer horizontal to vertical pocket zippers, so that things don’t fall out. To me, a separate compartment below the bag’s main compartment, reached through a full- width zipper opening, is a must.
Some bags have sewn-in dividers in the main compartment. Although these help in organizing things, the resulting compartments are too small for some things I often carry, like a 4-quart cooking pot and my capacious 2-person tent in its stuff sack.
For the packbag materials, I recommend waterproof nylon— although in a heavy rain some water will work its way through the seams and under the flap anyway. To minimize water penetration, paint the seams with seam sealer and choose a bag with a long cover flap. A long flap is also desirable when you pack is brim-full and you must carry your sleeping bag or foam pad on top, under the flap. A waterproof pack cover will keep your pack contents dry under most adverse conditions. You can buy or make a form-fitted, coated-nylon rain cover, or use a large, heavy-duty garbage bag with holes cut for shoulder straps and hip belt. Such a cover is also handy for covering your pack at night if you don’t want it in the tent.
There are numerous ways of tightening down the flap of the packbag, and numerous kinds of zippers. Some are easier to work than others, so check these features on the packbag you are thinking of buying.
Internal-Frame Packs
The development of the kind of pack described above was a major revolution in pack design. Another, more recent revolution was the development of large packs which have no exterior frame but which nevertheless can transfer most of the weight to your hips. This transfer requires attaching lengths of aluminum, stiff foam, or plastic to the packbag’s fabric. Once the pack is stuffed properly, the entire unit becomes fairly rigid and can transfer weight to your hips through the hip belt.
Internal-frame packs are designed for mountaineering, back country skiing, and carrying loads over uneven terrain—activities in which there is more upper-body movement and more balance is required. The pack will flex as you lean over, reach for handholds, or swing your arms as you ski. In addition, it fits closer to your back and the load rides lower than with an external-frame pack, lowering your center of gravity for better balance. The pro file of an internal-frame pack is narrower than that of an external-frame pack, and hence less likely to get caught on tree limbs along your path.
While internal-frame packs work quite well for backpacking, they have disadvantages compared with external-frame packs. For one thing, internal-frame packs were generally designed for smaller loads than external-frame packs, and they don’t have the capacity for the loads required for trips of over about one week. They also have fewer compartments and pockets to help keep all your equipment organized, and fewer places outside the pack to attach gear. An internal-frame pack requires more care in packing to keep the weight properly distributed, and once the pack is full, it is more difficult to get at items that are buried deep in it. Internal-frame packs are also more expensive than external-frame packs.
Internal-frame packs can be more easily handled as luggage on plane flights, bus rides, etc. Some internal-frame packs even convert into suitcases called travel packs. After you zip a built-in fabric flap over the hip belt and the shoulder straps, the pack looks like a soft suitcase, and the damageable suspension system is protected. On most, the suspension system is compromised in favor of the suitcase design, yielding a pack that is suitable only for light loads carried for short periods. A travel pack—or any pack—suitable for backpacking needs to have a suspension sys tem that will allow the weight of the load to be carried mostly on the hips, with the shoulder straps primarily keeping the pack from falling backward. The packbag needs to have compartments and/ or several compression straps to hold the load in place. (Compression straps are straps on the outside of the pack which tighten around the pack to hold the contents in place.) These features are typically found in the largest and most expensive models.
As for fit, the suspension systems on most internal-frame packs are adjustable. Help from someone experienced in fitting packs is important, to insure the proper adjustment. When the pack is loaded with gear or weights, the hip belt should squeeze the crest of your hips. The shoulder straps should rest evenly on your shoulders, with the stabilizer straps (attached from the shoulder straps to the top of the “frame”) angling upward from your collarbone to the pack “frame.” The sternum strap should cross the center of your chest. In some packs the aluminum stays can be bent to custom-fit the pack to the contours of your back. When choosing a pack, try a variety of brands and models to see which suspension system is most comfortable for you. And as you shop, keep in mind the pocket arrangement that will best fit your own needs. A feature some models of pack offer is a detachable hip or day pack, which replaces the need to carry an additional day pack if you plan to do much day hiking.
The Sleeping Bag
In the desert and in lowlands, a dacron sleeping bag can be fine, but for mountain backpacking a well-made sleeping bag filled with goose down or one of the newer synthetics is desirable—if not essential. It can be compressed into a small sack for carrying, and yet it fluffs up thick enough to provide warmth in freezing temperatures or even lower. Goose down gives more warmth per ounce than any other material. An ounce of good down will take up 600 cubic inches of space, but will compress to only about 15 cubic inches for carrying. A good goose-down sleeping bag that you can stuff into a football helmet will fluff up to give you two or three inches of blanket on top of your body.
The smallest bags are “mummy-shaped,” widest at the shoulders and tapered at each end. Some people, however, need more width. Sleeping on my side in a slim mummy bag, I wake up every time I try to draw up my knees inside the bag and can’t. So I use a modified mummy shape, which tapers only a little. It weighs about 25 percent more for the same amount of warmth, and it occupies about 25 percent more space in the pack. Mummy bags are more efficient at keeping you warm. The less sleeping bag your body has to heat up, the sooner you will be warm and the less likely the bag is to develop cold spots during the night.
If you shop thoughtfully for a sleeping bag, you will probably get pretty much what you pay for. You pay more for better-grade down or synthetic, and you pay more for a more intricate pattern of dividers inside the bag to keep the down or synthetic from shifting around. You also pay more for better stitching, and for better fabric. Finally, you pay more for more “loft”—the thick ness of the whole bag, top and bottom, when it is shaken out flat. Ten inches of loft should be enough on top of Mount McKinley; don’t buy that much if you are not going to sleep in such a cold place. If you are an average person, then four inches of loft will probably keep you warm at any temperature above freezing—if your sleeping bag and everything you are wearing is dry, if you are out of the wind, and f your head is inside the bag. The last is a good reason to buy a bag with a hood.
Since the four inches of loft is the thickness of the whole bag, about two inches will be above you. Beneath you, the bag will compress, and there will be far less than two inches of thickness. That’s why you will need a mattress (see below).
Often, manufacturers describe the warmth of the bag in terms of a temperature rating rather than loft. These ratings are not standardized in the outdoor industry, so tend to be subjective. Temperature ratings do take into account variations in bag de sign such as having a hood and a collar that will increase warmth without adding loft. I know that a bag rated to 15 degrees above zero will not keep me warm at 15 degrees, and probably not at 25 degrees either, but I tend to sleep cold. It will, however, probably be adequate for late spring through fall trips when the temperature doesn’t drop much below freezing, and I wear my long underwear and pile jacket inside. Someone who sleeps warm, however, may be quite comfortable in the colder temperatures without additional clothing layers. Because there’s so much variation in how warm different people sleep, and variation in how warm any person will sleep under different conditions depending on how tired, hungry or thirsty that person is, use temperature ratings as a general guide, keeping in mind your own internal thermometer.
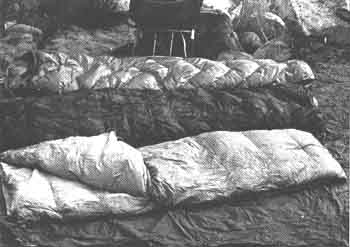
Fig 2-2: Top to bottom: mummy bag, modified mummy, rectangular
bag.
Deciding between a down and a synthetic bag depends on your budget and the climate you plan to use it in. Down is more ex pensive than synthetics, yet it is more compressible for packing, lighter weight, and more durable. With repeated compression, a down bag will retain its loft about twice as long as a synthetic bag. The newer synthetics are making advances in compressibility and light weight, but still cannot compete with down’s longevity. The advantages of a synthetic bag are 1) it costs less, 2) it will retain some insulating value when wet, 3) it will dry quickly in the field, and 4) it is easier to clean (see Section 12). A soaked down bag can take days to dry, and offers no insulation. If you plan to hike in wet climates, such as the Pacific Northwest, a synthetic bag is your best choice. Where rain and humidity are less of a concern, a down bag will give you the best value.
The great disadvantage of down—that it won’t work when wet—can in part be overcome by the use of Gore-Tex. For out door clothing—and a sleeping bag is basically a garment—people have long wanted a fabric that would not let rain in but would let out the moisture that the body gives off. You have noticed that if you wear a coated nylon garment, you soon feel clammy and wet—that’s your body moisture condensing on the inside of the garment, even when you aren’t sweating. If a sleeping-bag shell were made of such material, it would trap your body moisture, and before dawn the down would be rather moist and hence not a good insulator. Gore-Tex and other similar fabric treatments are being advertised as the long-wanted waterproof-breathable fabric, and are being used in making sleeping bags, tents and out door clothing.
Gore-Tex is good for keeping light dew, snow, and condensation that occurs inside a tent from soaking through your sleeping bag, but a Gore-Tex sleeping bag won’t replace a tent for protection from rain and heavy dew. Moisture will seep through the seams, and prolonged exposure to water can soak the bag.
If a down bag with Gore-Tex is beyond your budget, or you will be camping in wet places, choose a mummy-shaped sleeping bag filled with some synthetic material. Since synthetics do not compress as much as down, get the smallest synthetic bag you can possibly sleep in.
Buying a small down bag for a young child is very expensive unless successive children will inherit and use it, so for children the best choice usually is a synthetic-filled mummy bag.
When shopping for a bag, test the zipper to see that it slides easily and does not tend to catch the interior cloth. Then try sliding the zipper from inside the bag. Also try tightening and loosening the hood drawstring, if the bag has one.
Most sleeping bags come in two sizes based on height, and most offer the option of having the zipper on the left or the right side. If two of you are shopping for sleeping bags you would like to zip together, mummy bags will work, as will non-mummy bags. Buy one with the zipper on the left side and the other with the zipper on the right side. The bags can then be zipped together side by side to create a double sleeping bag. To save weight, some manufacturers offer a single sleeping bag that, when opened up and zipped to a bottom, single layer of nylon, creates a very light weight and inexpensive sleeping bag for two.
Carry your sleeping bag in a waterproof stuff sack with a draw string. (In wet climates use a plastic garbage bag also, to be doubly sure.) You can stuff it smaller than you can roll it, and the sack will protect your expensive investment.
When storing your bag, leave it loose—don’t compress it.
What about a pillow? You can do without one; you can put your clothes or boots under the head of your sleeping bag or you can make a pillow by stuffing clothes into the sack that carries your sleeping bag. I carry a small zippered, cotton pillowcase and stuff my clothes into it. In bed, I wear a knit cap, which allows me to stick my head outside the bag, where it likes to be except on very cold nights. (If you keep your head inside the bag, your breath’s moisture will condense in it.)
The Bed
What to put under your body is another story. Your weight, of course, compresses the filling of your bag until it is very thin, so you need something more between you and the cool, damp (and sometimes hard) ground.
At one time the most popular mattress was an inflatable air mattress, and some backpackers still use one, but most use a foam pad. Basically, there are two kinds—closed-cell and open-cell. A closed-cell foam pad (Ensolite is the commonest material) com presses much less than an open-cell pad, and is a better insulator. The common 1/2 inch thickness doesn’t offer enough padding for real comfort if you sleep on your side. Open-cell pads come in thicknesses up to 2 inches, which is plenty for comfort. A closed cell pad is impermeable to water and air, and hence is preferred by most for winter and wet camping.
Self-inflating air mattresses are another option for sleeping comfort. Therm-A-Rest, the most popular brand, consists of open- cell foam covered by airtight, coated nylon. While these are much more expensive than other foam pads, they offer excellent insulation and comfort. They do require extra care in keeping the valve free of dirt and preventing punctures. Although they are tolerable to sleep on when deflated, carry a patch kit in case of puncture.
Whether you choose an air mattress or a pad, you have a choice of lengths, from 6 feet down to about 3 1/2 feet. Naturally, you should choose the shortest one you are comfortable on. That may be one that reaches only from your shoulders to your hips. I like some padding under my head, but below my knees the bare ground, my empty pack or some clothes is usually enough.
Most children and some adults sleep comfortably with no mattress to give softness, so long as they don’t get cold from contact with the ground. If you are one of them, you can, in warm weather and at low altitudes, dispense with a mattress and use just a plastic sheet, to protect your sleeping bag from dirt and to keep out the dampness of the soil.
Before you buy a pad, lie down on it in the store. They won’t mind. On your trip you will be sleeping on ground just as hard as the store floor, or even on rock.
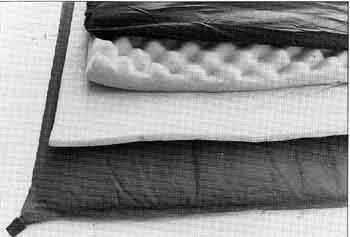
Fig 2-3: Top to bottom: nylon cover for open-cell foam pad, open-cell foam pad, closed-cell foam pad, Therm-A-Rest.
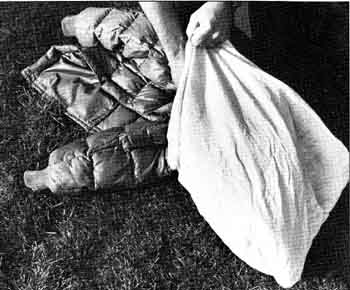
Fig 2-4: Stuff pillowcase with clothes to make pillow
The Tent or Tarp
Unless you’re willing to take a chance on getting soaked, or even freezing to death, you need a tent or tarp. Tents are expensive, tarps are cheap. Tents keep out the wind; tarps don’t. Tents generally keep out the rain; tarps keep out some of it. Tents keep out insects; tarps don’t. Tents give privacy; tarps don’t. Tents keep you a lot warmer, tarps a little warmer. Tents weigh more. So you have some choices to make.
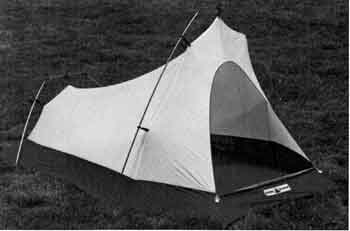
Fig 2-5: Lightweight 2-person tent (rainfly not pictured)
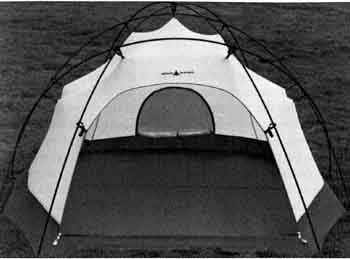
Fig 2-6: 3-person dome tent (rainfly not pictured)
In recent years the weight of backpacking tents has been de creased considerably, so that the weight advantage of a tarp is less than it once was. A good wilderness tent that sleeps two or even three persons typically weighs about 4 to 6 pounds, including stakes, poles, ropes and rain fly. (A rain fly is a fitted, water proof “umbrella” that goes over the tent body.) If you usually go with a larger group, you might buy a 4-person tent that weighs 8 to 9 pounds with everything.
Backpacking tent designs have come a long way in recent years. Once all you could buy was a “pup” tent, a triangle in cross section with the ridge held up by a pole at each end. Now there are literally hundreds of shapes of tents. For convenience, we can classify them as follows: dome tents (also called free standing tents) versus tents requiring stakes and/or guylines to stand, and 3-season versus 4-season tents. Dome tents, whether 3- or 4-season, come in a variety of shapes, but all are held up by poles under tension that arch diagonally across between opposite sides or corners. There are usually from 2 to 4 of these poles. Since dome tents require no stakes or guy lines to stand erect, they are very convenient, particularly in rocky areas where it is difficult to drive in stakes. They’re also good to have when all you need is privacy or something to keep the mosquitoes away. In a big wind, a dome tent will require stakes and sometimes guy-lines to keep it from blowing away, and in the rain or snow to make the tent fabric taut enough for water to flow easily off the tent sides—and to give strength. Tents that require stakes in order to stand come in many shapes, from the A-frame design similar to the old “pup” tent to tunnel-shaped tents with arching poles. These tents tend to weigh less than similar-sized dome tents, since they usually have fewer poles.
Three-season tents are tents designed for use in late spring, summer and early fall as compared with 4-season tents, which are strong enough to handle high winds and heavy snow. These added strength features in a 4-season tent make the tent much heavier and are unnecessary for most backpacking.
Whatever shape of tent you buy, the important things are the same: cost, size, amount of usable space, weight, water repellency, wind resistance, ventilation, quality of workmanship and ease of erection. Since a good tent costs so much, you should borrow or rent several kinds before you buy, and talk to tent owners about their experiences. When examining a tent, pay particular attention to how smooth and tight the cloth is when the tent is erected. Don’t buy one that has a lot of wrinkles and sags; it wouldn’t withstand brisk winds, let alone gales.
After you do buy, practice pitching your tent at home before you pitch it in the wilds, where it just might be windy, raining or dark. I have had to get out of bed on moonless nights and pitch my tent before a storm hit, and although I never did it with my eyes closed, I think I could have.
Gore-Tex, mentioned above in the discussion of bags, has also been used to make tents. These tents don’t require a rain fly be cause the Gore-Tex bars rain but passes water vapor out. Gore Tex tents are all right where there is plenty of ventilation and where temperatures stay above freezing. Below freezing, the water vapor inside the tent condenses and freezes on the inner walls. Once frozen, it won’t pass through the material as water vapor will. There are other tents without rainflys, made of waterproof fabrics, but unless they are very well ventilated, water will con dense on the inside walls and eventually get things pretty wet.
Once, campers typically ditched their tents, digging a trench around the tent to carry rainwater so it wouldn’t flow under the tent and soak up through the floor. But now most tents have a waterproof material on the floor, which also runs about six inches up the walls, so you don’t need to dig a trench. Besides, digging a trench would violate the minimum-impact ethic.
A tarp is a flat piece of material that is waterproof or nearly so. The cheapest tarp is one made of polyethylene sheeting, from 2 to 4 mils (thousandths of an inch) thick. More expensive and more durable is coated nylon. A poncho, which is a sort of rain coat, can double as a tarp in camp, because it can be laid out flat. Some plastic sheets, some ponchos and all coated-nylon tarps have grommets around the edges for tying cord to. Gadgets for tying to an ungrommeted plastic sheet are available in equipment stores, or you can push a small, smooth object into the tarp and tie a loop around the base of the “wart” you thus create.
Another inexpensive type of shelter is a “tube tent,” a rectangular piece of plastic or coated nylon about 9 by 10 feet which has been formed into a tube by sealing together two opposite edges. When you string a taut cord through the tube about 3 feet above the ground to form a ridge, and unroll your sleeping bag inside to hold down the “floor,” you have a tent of sorts that is open at both ends. With clothespins you can close the ends enough to keep out the rain during a light rainfall, and you can also pinch the plastic onto the cord so that it doesn’t slump toward the middle of the slightly sagging cord.
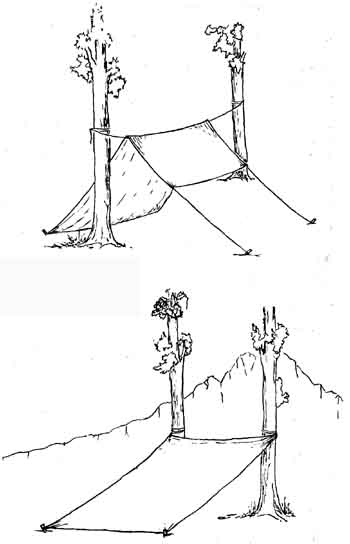
Fig 2-7: ways to pitch a tarp (trees are not always in the right place)
As to the merits of sleeping alone or together, people’s tastes vary, but there’s no denying that sleeping together conserves body heat better. That goes for two in a tent in two sleeping bags, or two in one sleeping bag.
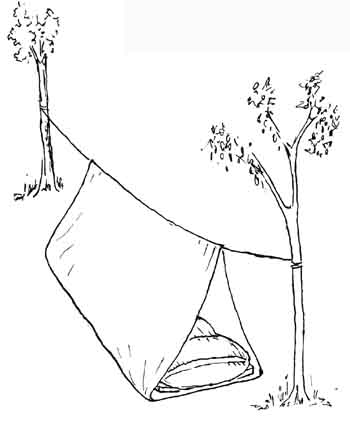
Fig 2-8: Tube tent needs trees
Other Equipment
A flashlight is almost a must. Some experienced backpackers rely on getting their eyes adapted to the dark, and even walk on moonless nights. They have to avoid looking at even a match flare if they don’t want to wait 30 minutes for their eyes to re adapt. Lightweight flashlights are available that use two AA batteries. They weigh much less than those using C or D cells, give adequate light, and are much easier to hold between your teeth when you need both hands. A headlamp, which is basically a flashlight that straps to your forehead, is convenient for keeping your hands completely free while you make dinner, pitch your tent, or hike in the dark.
With any flashlight, you must guard against its turning on in the pack and thus running down the batteries. To avoid this, de pending on the design of your flashlight, you can unscrew the bulb partway, reverse one battery, or tape the switch off. Two alkaline AA batteries last me through a one-week trip if I avoid using them except when I really need the light.
A knife belongs with every backpacking group, if not in every hiker’s pocket. Many knives are gadgets and conversation pieces, and are too heavy for most purposes. You can spend up to $70 for a knife with 10 or 12 blades, including a corkscrew. But most of your knife use will be confined to the cutting blade or blades, and you might be satisfied with a simple, one-blade, good-steel pocket knife. The romantic image of the expert outdoorsman carrying a long hunting knife in a belt sheath is very out of date. Unless you are going to dress a deer in the wilderness, a 3-inch blade is long enough.

Fig 2-9: Too-big knife, good knife with belt attachment
Some kind of water purification system is required on almost all backpack trips. Earlier editions of this guide said that “in true wilderness, the water is usually safe to drink.” We can no longer say that because of the spread of the protozoan Giardia lamblia, which can be found even in remote lakes and streams. Drinking water infected with Giardia can cause a very unpleasant illness, giardiasis. Its symptoms are diarrhea, nausea and stomach cramps.
Fortunately, preventing giardiasis isn’t too difficult, and there are several options. You can disinfect your drinking water by boiling it for at least one minute (at sea level—it could take 15 minutes at 10,000 feet). This method is quite effective for killing Giardia, though time consuming. You’ll need to carry enough purified water for your hike (or stop to boil more as needed) and additional fuel in your already heavy pack. Disinfecting your water with iodine tablets is the lightest-weight method and is fairly simple. Disadvantages are that some people don’t like the slight iodine taste of the water and you have to wait one-half hour for the disinfecting process when you use any iodine-type system. Iodine tablets lose their potency soon after the bottle is opened, so any tablets remaining after the end of the season should be discarded. Although iodine is recognized as quite effective against Giardia, there is some question as to the effectiveness of chlorine.
Filtration is another method you can use to purify your drinking water. There are several backpacking water filters available. Though somewhat-to-very expensive, they are convenient and provide good-tasting, clean water almost instantly. Filters avail able on the market are either of the disposable variety, which are less expensive, or the re-usable and cleanable variety, which are much more expensive in the short-term, but will last through many lifetimes of the disposable variety. If you buy or borrow one, be certain the filter’s pores are small enough to remove Giardia cysts.
The filter should be labeled effective against Giardia—2 micron screen. Even better is a 0.4-micron screen, effective against Cryptosporidium.
Since a pint of water weighs a whole pound, don’t carry more than you need, as most beginners do. In early season in the mountains, rills and rivulets are everywhere. In late season, if you have some camel blood in you, you can go for several hours over easy terrain without getting too thirsty. I carry a quart Nalgene bottle but don’t always fill it. I do make sure to keep it handy so I will continue to drink throughout the day to stay well hydrated (see Section 10, “Safety and Well Being”).
Cord is useful for many purposes. Braided nylon 1/8 inch in diameter (parachute cord) tests out at over 500 pounds breaking strength, enough for a simple rescue. In bear country, you need 50 feet of it to throw over a tree branch so you can hoist your food out of harm’s way (see Section 7). You will have tied enough cord to the tying places on your tent or tarp before leaving home, but in a big wind you might need an extra supply. Nylon cord is also good for erecting a tube tent, stringing a clothesline, making emergency repairs to pack or boot, and giving added security when you are fording a rushing stream. I carry 100 feet of cord, including the 50 feet for bears.
On short trips with a few people, you do not need a whole roll of paper towels or toilet paper When the rolls in your house get down to the right size, put them away with the backpacking sup plies.
A few other pieces of equipment are necessary, such as a first- aid kit, but these will be discussed in the appropriate sections. See Section II for a checklist of equipment, clothing and sup plies.
If you can’t afford a lot of new equipment, look around for used equipment. Bulletin boards at mountaineering stores, colleges and other places often have good bargains, and stores specializing in used equipment are springing up. See also the classified ads in any magazine or bulletin that circulates among backpacking types. Check the latest imports. Some are reason able facsimiles of American-made equipment at a lower price.
PREV: Getting Started
NEXT: Clothing
All Backpacking articles
© CRSociety.net