WILLOW CHARCOAL
Willow charcoal is a very good medium for producing strong but fluid line drawings.
When we are using line, we must have a clear view of our aims and objectives. This is true of any type of drawing, of course, but line does offer so many different ways for us to express our ideas. One of the most enigmatic things about line is that it’s a pure metaphor (a metaphor is something that acts for something else). Artists who paint reference colour, and artists who sculpt reference form or shape. Line is a pure visual language that we can use either expressively or analytically relative to our observations.
1,4 In fig 1 notice that two lines have been drawn opposite each other. Taken together, these two lines give the impression of a concaved shape. When this type of line is used to describe reality, as in dwg. 4, it becomes apparent that, although one has drawn or copied what one has seen, the end result does not necessarily describe what is there.
2,5 Here again we have the same problem, one line that implies a concave and the other line implying a convex. When we apply this to reality, or we draw what we see, we sense that the illusion is not working.
3,6 In 3 we see two lines that imply convex edges of a form. These two lines working opposite each other now begin to imply the illusion of an ovoid form that is pushing them out. If you now look at fig 6, notice that the area of the neck has a sense of form and volume. This is due to the use of convex lines that work in tandem with each other.
7,8 These two further comparisons highlight this phenomenon. +=+= 7 is a drawing of a head and torso drawn very literally, as we might see it. In other words, we’ve drawn the truth. However, 'art is a lie that enables us to see the truth', said Picasso. The dotted lines highlight the concave areas on the dwg., and if drawn in a concave way the sense of volume is denied.
We see the same figure in the same pose but drawn with lines that are convex. These lines break into the figure, creating the idea of overlap. This system of drawing gives an illusion of form and volume in space. This is very much how artists such as Michelangelo, Leonardo, Rubens, and others would use line as a metaphor to create the illusion of form and volume in space.
Right: After Rubens. The superficial muscle.
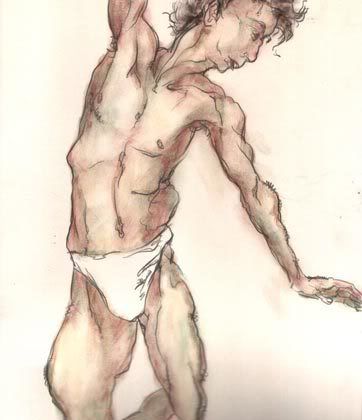
Drawing after Egon Schiele with emphasis on concave lines.
SUPERFICIAL MUSCLE
This drawing of the whole figure goes much further than the pure outline of the previous illustrations.
In the previous illustrations, the form is only suggested by the convex outlines, but in this drawing the superficial muscle - i.e. the muscle that lies just below the surface of the skin - is not only implied but also drawn much more conclusively.
In the next illustration we can see that the artist Egon Schiele has used the line to express the opposite effect to that of frailty and fragility. He has done this by putting less of an emphasis on the convex and more of an emphasis on the concave lines. We can immediately see that the form in these circumstances tends to be denied. This, however, does not make one drawing better than the other. Both are expressions of what the artist wanted.
THE INCISED LINE
The incised line is a line that seems to cut across the paper implying a sense of direction. It’s made by using the charcoal on its side to make this precise line. This method of drawing not only picks up the dynamics of direction through the outline of the figure, but at the same time it informs us of the changing planes of the form within the figures.
In this next series of drawings, the medium of charcoal will be used to show an expression of movement.
1a/1b Place a number of drawings of different poses one over the other as seen in the illustration. Pose the model; make the drawing of the model using outline as previously suggested. Pose the model again and make a further drawing over the first drawing, and repeat this process again. On the third drawing you will start to become lost and a sense of confusion will be what you are feeling. This is a sensation that we want to create, as it’s only when you are lost that the drawing can be found. This is a very useful drawing for students as it helps to develop an abstract sensibility. What we’ve created here for the artist is a very important state of mind, as you can now develop the drawing's potential as an abstract piece. One way of doing this is to take a small window mount and start to place it over areas of the drawing. You will find that interesting developments appear for you to make larger drawings from.
1c) As with the first drawing on movement, take a window mount and place it over the drawing to create new dynamic abstract compositions. From these discoveries you can make larger exciting drawings.
2) Instruct the model to move through a series of actions, for instance walking then bending. While you are doing the drawing, the model should repeat these movements at the same pace. Start your first drawing at a very slow pace. As you get used to the method of drawing, you can then speed up.
Remember you are not drawing the model but the action. What you are trying to draw, using line, is a continuous flow that gives a sense of the action of the model as they move through space and time. The best type of line to use for this is what artists call 'continuous line'. This in effect means that you don’t take the charcoal off the paper as you are making the drawing. However, you should allow for different weights of mark that express movement both across and into the picture plane.
THE MOVING VIEW
Before the 1900s artists would realize the world from one point or view. The viewer would be presented with that view and would understand the scene from that perspective.
This was a traditional way of presenting our understanding of the world two dimensionally that had been used for centuries in a western cultural ideal.
However, our attitudes began to change at the beginning of the 20th century, and other ways of seeing began to be explored. Our attitude to the one point view began to change. Artists such as Picasso and Braque began to experiment with multiple views of the same subject on the same picture plane.
What they intended to do was to present a view of reality along with another view of the same reality on the same piece of paper. So, the birth of Cubism.
The moving view is the perfect way for us to extend our understanding of the world visually using the medium of willow charcoal.
1a) Set a simple still life up on a table or a board that you can easily rotate or move around to take up different positions. The objects you choose for your still life should have basic formal different characteristics.
Position one of the objects in the group in a central position; this is for reference reasons in the following drawings.
1b) Take up your first position and then draw your still life after the manner of the negative space drawing, locating your composition through the window mount.
1c/1d The next part of the drawing is to move your position or turn your still life around on the table so we are now looking at the group from the side. Start your second drawing over the top of the same drawing using the central object now as your reference point to compose your drawing. This point will be your main point of departure for your next drawing, as it will help you as the drawing develops and becomes more complex.
Repeat for a final time so that your last drawing as it were was from the back view.
When one has finished you will have three linear drawings from the same still life done over the top of each other.
1e) We can now begin to take from this drawing the visual potential it has to offer as with the previous drawings in this section.
One way to do this is to take the window mount and place it over the drawing in different places until you find an interesting composition that you would like to transpose. Once one has made a larger copy of this section one can now begin to shade the drawing in as we’ve shown you in the pencil section - the drawing after Cezanne Landscape.
The shaded drawing.
TONAL REDUCTION DRAWING USING SCENE PAINTER'S CHARCOAL
Scene painter's charcoal is very useful for very large line drawings or covering very large areas of tone quickly. In this project, we are going to use it in conjunction with willow charcoal to create a reduction tone drawing.
1) Take your A1 sheet of drawing paper and using your scene painters charcoal cover the whole sheet of paper so it’s black all over.
You now need a good strong plastic eraser to take out the charcoal to reveal the light. It’s probably a very good idea to illuminate the still life as we’ve done here with the floral arrangement.
When you start to rub out the light areas don't be too particular if you rub out too much as we can work back into the drawing at a later stage with the finer charcoal to bring back the detail. However, one should try to make the area as clean and as light as possible to give a good sense of contrast.
When one is happy that one has removed the main light areas, one can now think about working back into the drawing with the finer willow charcoal bringing a more accurate rendering of the light and dark tones. In addition, give attention to textural and other detail where necessary. When one has finished the drawing, as with all charcoal drawings, one must remember to fix them.
Cont. to: PENS, INKS, BRUSHES and PAPER
Prev.: | Next:
top of page Home Page