The electrical system in your car acts, in a sense, like the nervous system in your body. It provides control over various engine parts; supplies power to run and activate numerous devices and systems; and raises alarm through sensors, warning lights, and buzzers. The complete system is composed of a starter circuit, an ignition circuit, a charging circuit, and various lighting circuits and accessory circuits. We will deal only with those elements of the electrical system that normally require periodic maintenance.
THE CAR BATTERY
The battery is the heart of the electrical system. With the engine off, the battery supplies current to operate the lights and accessories. It supplies the power to start the engine via the starter and ignition systems. The car battery is actually a miniature power plant that stores energy in chemical form (Fig. 1).
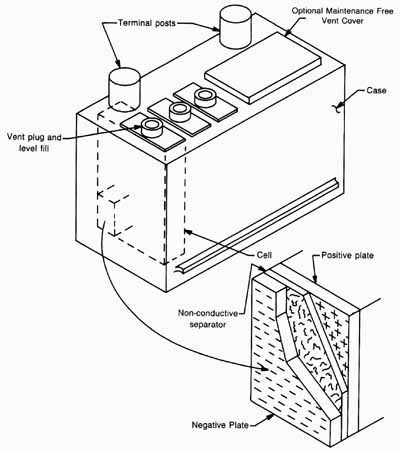
Fig. 1. Typical car battery.
There are two main types of batteries for passenger car use: the lead-acid battery and the alkaline battery. The lead-acid type is used in the vast majority of cars and is the one referred to in this text. Because most modern automotive electrical systems are rated at 12 volts, we will concentrate only on 12-volt systems.
The modern 12-volt, lead-acid storage battery is made up of 6 cells, each able to supply approximately 2 volts. They are electrically connected inside the battery case to supply the needed 12 volts. Each cell is constructed of two sets of plates immersed in an electrolyte, which is composed of sulfuric acid and water. Normally, one set of plates is made from porous lead while the other is made from lead peroxide.
The cells work on the principle of ion transfer. The electrolyte reacts chemically with the plates, resulting in an accumulation of positive ions on the lead peroxide plate. This gives it a positive charge. As the positive ions leave the lead plate, it becomes more and more negatively charged. Electric current then flows from plate to plate and is added up from all the battery cells to flow from one battery terminal through the electrical system, back to the other battery terminal and into the electrolyte again.
As the battery is continually called upon to supply electricity, the chemical reaction within the cells forms a coating of lead sulfate on the surface of the plates. The battery becomes weaker as this coating builds up. It eventually goes dead when the plates have been coated with sulfate, to the point where an electrical charge cannot go through the thick sulfate coating.
Batteries are rated in a number of ways. Cold-start capacity is probably the most important. Cold-start capacity is the number of amperes a battery can deliver to the starting circuit at 0 degrees Fahrenheit for 30 seconds before cell voltage falls below 1.2 volts. A cold engine can draw as much as 400 amps from the battery during starting. This is extremely high current draw. Never crank the engine on cold start for more than 30 seconds at a time to help avoid premature battery discharge.
Wear
Normal battery wear is caused by sulfation of the cell plates, as explained above. Recharging will usually reverse the sulfation process and restore the cell plates to their original condition. It is advisable to recharge the battery as it weakens, rather than when it is completely dead. Some battery cell plates can become so encrusted with sulfate that they may disintegrate or cause short circuits within the cell.
In normal battery operation, gases are given off that can promote terminal corrosion. Terminal corrosion will reduce current flow through the battery cables and on into the electrical system. Check for terminal corrosion twice a year and clean as required. Coat the terminals with petroleum jelly or a special terminal coating made of white grease to help prevent future corrosion. Making sure the cable ends fit tightly around the terminals also helps reduce corrosion.
Batteries can also become drained or fail prematurely from other causes. If the battery periodically requires a considerable amount of water, it is being overcharged. Overcharging will eventually cause the cell plates to buckle and fail. Check out the charging system and bring it to factory specifications.
A cracked battery case can be caused by hold-down clamps that are either too tight or too loose. A bulged case can be caused by a hold-down clamp that’s too tight.
Additional corrosion can be caused by a dirty battery top. A dirty battery top collects salts that provide an electrical path from terminal to terminal on batteries. This causes loss of battery power and further corrosion. Clean battery cases once a year, or as needed, to avoid this.
Care
Batteries are husky and heavy, and if properly mounted, need very little periodic care. Provide the care mentioned above to correct and prevent problems.
Check the water level in the battery every month and bring to the fill line. Maintenance-free or low-maintenance batteries can be checked less often. Check the battery charge with a hydrometer. The hydrometer measures the density of the electrolyte in each cell. Fully charged batteries show hydrometer readings of 1.265 or more. A fully discharged battery will test at about 1.150. Follow the directions that come with the hydrometer to properly perform the test and interpret the readings.
When filling the battery with water, there is no need to use distilled water. Most battery manufacturers fill batteries with drinking water. Use distilled or bottled water only if your water supply is hard and/or has iron-bearing minerals or iron bacteria dissolved in it. Never add acid to the battery. Acid doesn’t evaporate and, in a sense, is never used up. And never put any kind of battery additives into the battery. Although these are supposed to enhance ion transfer in older batteries, their effectiveness is still questionable. By the way, if you pour a battery additive into the battery, you will void your battery warranty.
Keep the battery charged to at least 75% charge at all times. A hydrometer reading of about 1.230 indicates a 75% charge. Recharge the battery when readings fall below 1.230. In the winter you may want to supply a trickle charge overnight for continued ease of starting in very cold weather. Trickle charging should not be used extensively, however, because it can cause overcharging of the battery.
For extremely cold weather consider using a battery or engine warmer when starting the car. Battery warmers run on house current and either wrap around the battery like a blanket or are a pad type on which the battery sits. A warm battery will provide better starting on cold mornings.
Also, for cold-weather starting, consider one of a number of engine heaters on the market. The in-line type heater pushes warmed engine coolant through the engine block. It is spliced into the heater outlet hose. The block type heater is mounted in place of a core plug in the engine block. It has an electric heating element that directly heats engine coolant in the water jacket. The radiator hose heater type is spliced into the lower radiator hose. It also heats engine coolant. Tank heaters are mounted between the heater outlet hose and the drain opening on the engine block. Lastly, there is the dipstick heater that merely slides into the oil dipstick tube and warms the oil. It is the least expensive and simplest heating device to install.
ELECTRICAL CONNECTIONS AND WIRING
The cause of many mysterious problems is often no more than loose, dirty, damaged or corroded electrical connections. It is important to clean and tighten all loose electrical connections. Loose connections may cause arcing between a terminal and wire connector. Loose connections also allow dirt and grime to collect at the terminations, leading to poor conduction of electricity. Check, clean, and tighten all electrical connections before performing any tune-up work and at least twice per year.
Check for cracked, torn, or blistered insulation on wiring. Blistering might be caused by excessive heat. Make sure wires are routed correctly in the engine compartment, especially any wiring that is blistered. Replace defective or worn wiring with the factory- recommended type.
Checking the ignition (spark) wiring is important. Cracks in the insulation can lead to high-voltage leaks and engine misfire. Ignition cables should not be cracked, burned, (too close to manifolding) or brittle. Ignition cables are available with three types of insulation: silicone, hypalon, and neoprene.
Silicone is used on modern cars with pollution-control equipment. These cars tend to run hot and need the greater heat resistance in cabling offered with silicone insulation. Hypalon and neoprene are all right for use in older cars, they will not last nearly as long as silicone. At replacement time, consider using ignition cables with silicone insulation.
Another choice you need to make when replacing ignition cables is the type of conductor you desire. Carbon-impregnated fabric cables are easily damaged and very fragile. They can’t be bent or abused. Use ignition cables with conductors made from aramid fibers or shielded metal wire. They are much stronger than the cables with carbon- impregnated fabric conductors.
Test ignition cables with an ohmmeter twice a year. Refer to the shop manual for the correct procedure to use and the readings you should expect. Replace defective wiring as required.
SPARK PLUGS
After the air-fuel mixture is delivered to the cylinder and sufficiently compressed during the compression stroke, it is ignited by a high-voltage spark generated between the electrodes of the spark plug. To produce the desired combustion of the air-fuel mixture, the spark must be at a high energy level during all engine speeds. Maintaining the spark plug is the easiest, and probably one of the most important, things you can do to maintain good gas mileage and engine efficiency.
The spark plug is nothing more than a center metal electrode that is surrounded by a ceramic insulator. The bottom of the ceramic insulator is fitted into a metal threaded casing that screws into the cylinder head. This casing contains the hex that fits into the spark plug socket wrench. Another electrode is welded to this metal casing. The electrode on the metal casing and the center electrode are separated by a small air gap through which the spark must jump.
It takes a certain amount of high-voltage energy for the spark to jump the air gap between the electrodes. If the gap is too large, the spark will not have enough energy to jump across, and engine misfiring will occur. If the gap is too small, the spark may not be of sufficient energy to ignite the air-fuel mixture, and poor gas mileage and fouled plugs could result. Check and adjust the spark plug gap twice per year and at every tune up. Remember, one spark plug that misfires can increase gasoline consumption as much as 35% in a four-cylinder engine and up to 15% in a V-S engine.
At replacement time, buy only new (not reconditioned), brand name spark plugs. Some stores offer them on sale from time to time. Stock up on them; their cost is mini mal. Consider replacing plugs every 15,000 miles. In addition to choosing a brand name, you must also choose the heat range of the plug.
Plugs for most cars come in a variety of heat ranges. The heat range is a measure of the plug’s ability to transfer heat from the insulator end near the gap area to the engine block. A so-called hot plug transfers heat slowly, staying hot. A cold plug will transfer heat more quickly and run cooler. Be sure you are using the correct heat range for your type of driving. If the plug is too hot, it will ignite the air-fuel mixture before it sparks, causing pinging. If the plug is too cold, it will not bum away combustion deposits in the gap area and may cause fouling. Use hot plugs for mostly city or stop-and-go driving. For highway or long-distance driving, use a cooler plug. The normal plug that is recommended for the car is intended for a mixture of highway and stop-and-go driving.
Normal Wear
Normal spark plug wear is caused by the interaction of the high-energy spark and the corrosive combustion gases that gradually attack and disintegrate the electrodes. The gap will slowly widen, resulting in decreased ignition efficiency. If the electrodes have not been worn down too much, a simple cleaning and re-gapping will bring the plugs back to design performance level. Although plugs can last up to 30,000 miles, we don’t advise cleaning and re-gapping past 15,000 to 20,000 miles. Considering their cost, it’s better to just replace them. Worn plugs that are re-gapped can still cause loss of engine power and speed, decreased gas mileage, and hard starting (Fig. 2).
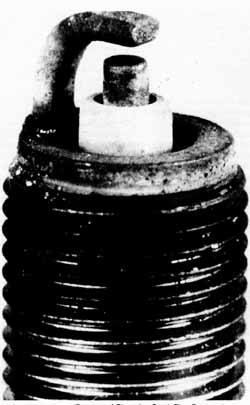
Fig. 2. Normal spark plug wear
Abnormal Wear
Premature plug wear or failure is usually a sign of problems with the ignition system or the engine.
Black, wet deposits (Fig. 3) are normally caused by oil leaking past worn piston rings or valve guides. In rare cases, these wet deposits can result from leakage of brake fluid past the brake booster diaphragm or automatic transmission fluid leaking past the automatic transmission modulator.
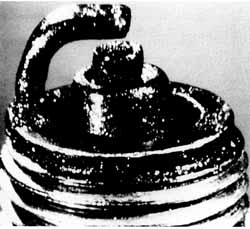
Fig. 3. Oil-fouled spark plug
Black, dry deposits (Fig. 4) can be caused by too rich an air-fuel mixture, weak ignition sparking, or use of plugs with a heat range that is too cold.
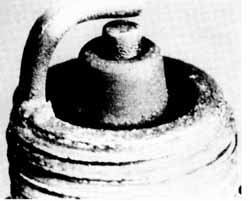
Fig. 4. Spark plug showing incorrect air-fuel mixture
Red, dry deposits are harmless, but should be cleaned from the plug. They are caused by manganese antiknock additives in unleaded gasoline.
A sign of an overheating plug is dark brown spots on the bottom of the insulator (Fig. 5). If the car is not pinging and the air-fuel mixture is not too lean, then suspect that the plug is being used at too high a heat range. Switching to a colder plug may help. If overheating is not corrected, the electrodes will quickly erode and the insulator may blister (Fig. 6). Also, check for a leak in the intake manifold near the affected cylinder.

Fig. 5. Overheated spark plug
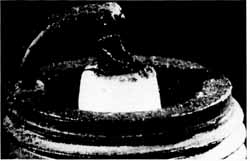
Fig. 6. Spark plug with blistered insulator
Most modem cars use unleaded gasoline. For those engines that still run on leaded gas, the deposits shown in Fig. 7 are indicative of lead fouling. These deposits are usually brown to light yellow or even white in color. If the electrodes are still in good shape, cleaning will bring the plug up to snuff.
Learn to look for and recognize patterns of plug wear or failure as well. Fouling of rear plugs might only indicate that the oil drain holes in the back of the cylinder head of V-8 engines are clogged or restricted. Overheating of rear plugs might also point to cooling system blockage in the water jacket. Two adjacent center plugs that are fouled on four- or six-cylinder engines could indicate a too-rich air-fuel mixture in the carburetor. In addition, two adjacent plugs fouled in a four- or six-cylinder engine or in one bank of a V-8 engine might be caused by a blown head gasket. These are the kinds of things a good mechanic would look for.

Fig. 7. Additive-fouled spark plug
DISTRIBUTOR, ALTERNATOR, AND TIMING
The distributor and alternator are part of the ignition system. The timing is the setting or adjustment of the distributor that allows smooth, sequential firing of the engine spark plugs. The distributor and alternator are the two components of the ignition system that normally require periodic maintenance, and so are covered here in some detail.
The combination of distributor and coil receives the low-voltage electricity from the alternator and steps it up to the high voltage needed to jump the spark plug gap. This higher voltage may approach 50,000 volts. Figure 9-8 is a simplified schematic of a typical breaker point ignition system, showing the alternator, ignition switch, coil, and distributor.
Most modern cars manufactured since 1974 have electronic ignition systems. How ever, older American cars and a few modem imported ones use the breaker point system. Breaker points are located inside the distributor assembly. They are mechanical contact points that act as a switch to periodically turn on and off the low-voltage current flowing through the primary winding of the coil. This low-voltage current induces a sufficient high-voltage current in the secondary winding of the coil which, in turn, is distributed via the rotor and distributor cap in a timed sequence (correct firing order) to the spark plugs.
The rotor is driven by the distributor shaft, which is geared to the engine camshaft in such a manner that the rotor will turn at half the crankshaft speed. This arrangement allows delivery of a spark to each cylinder once during every four-stroke cycle of the engine.
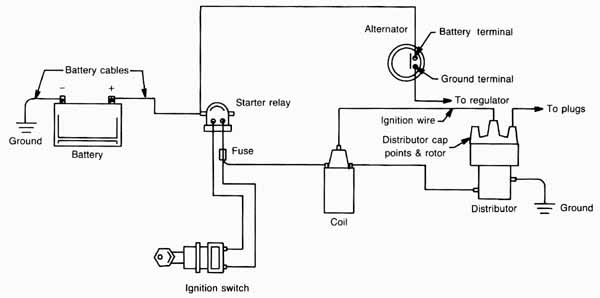
Fig. 8. Breaker point ignition.
There are a number of moving parts in the breaker point distributor and, of course, moving parts eventually wear or need adjustment. The breaker points commonly require the most care. Examine the points twice a year, checking for burning, pitting, or misalignment. Be sure to lubricate the cam on the distributor shaft that opens and closes the breaker points with the recommended grease. Be sure to lubricate other parts of the distributor also, as indicated in the shop manual. Do not over-lubricate. Also adjust the breaker point gap and dwell angle to specification at this time.
Check and clean the distributor cap twice a year. High-voltage current can easily leak from cracked or frayed ignition cables, or through cracks in the distributor cap. Dirt, grease, or carbon buildup can also provide a path for high-energy leaks. Clean any corrosion from the cap terminals with a brush or replace, if necessary. Replace the cap or rotor if either is cracked. Also, if the electrical contacts on the rotor or on those inside the cap are pitted or burned, replacement is indicated. Pitting of the breaker points is normally caused by a defective condenser. Installing a new one may solve point pitting.
As a general rule, breaker point distributor parts are relatively inexpensive. If anything seems wrong with any of the parts, it is usually much cheaper to replace them as soon as possible rather than to try to stretch their useful life. Worn distributor parts can quickly cost dollars in the form of lost gas mileage, adding up to much more than the cost of new parts.
As mentioned in section 8, check the timing twice a year and adjust if necessary. Timing is all-important. If the spark is timed to come too early, pre-ignition will result. If the spark is timed to come too late, poor engine power and low gas mileage will result.
The other part of the ignition system that might require periodic care is the alternator. Alternators generate the electricity to run the car, just as large generators produce electricity in power plants. The alternator is connected to the engine crankshaft by a fan belt. The fan belt turns the rotor of the alternator through the pulley shaft on the alternator to generate electricity. A defective alternator can very quickly drain a battery. Any indication of faulty alternator operation should be investigated immediately. Dashboard warning lights or gauges provide warning signals of impending trouble (Fig. 9).
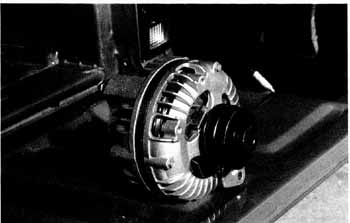
Fig. 9. Alternator.
At the first sign of trouble, test the alternator or other auxiliary ignition system equipment using the proper equipment and methods outlined in the shop manual. Normally the alternator will last 100,000 miles with little or no service. To keep it in top shape, there are some things you can do.
Check and adjust the alternator belt tension every month. A belt that is too loose or glazed will slip on the pulley and slow down the turning of the alternator, with subsequent loss of electric generating capacity. A belt that is too tight can cause premature wear of the alternator bearings. Adjust the belt to the proper tension recommended. Alternator brushes capture the ac current generated in the alternator through the slip rings. This current must be changed from ac to dc. Diodes take the current from the brushes and change it to dc for use by the ignition system. They eventually wear down, however, and will need to be replaced, especially if you are planning to keep your car for more than 100,000 miles. The cost of replacement is minimal. Replace whenever the brushes are worn past the indicator marked on the brushes or at 100,000 miles, whichever comes first. At the same time, clean the slip rings in solvent and lightly sand with 3/0 paper. Refer to the shop manual. If the rings are in poor condition, replace the entire slip ring assembly. Also, at 50,000 miles, consider running the alternator through the series of tests outlined in the shop manual. Correct any deficiencies found in the alternator.
STARTERS
The starter is simply an electric motor used to turn the engine for starting. The starter, like the alternator, normally lasts a long time without major service. The starter is activated by a switch, called a solenoid, that is usually mounted directly on the starter case. The starter motor turns the flywheel of the engine via a pinion gear on the starter shaft. When the engine fires, the starter pinion gear disengages from the flywheel. Because the starter motor must handle large torque to turn the engine, it should be serviced slightly sooner than the alternator—perhaps at every 75,000 miles (Fig. 10).
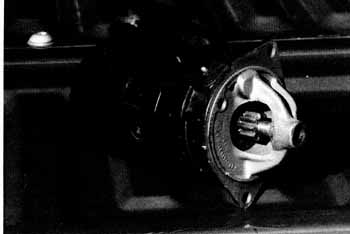
Fig. 10. Starter.
There are no warning lights or gauges to indicate starter troubles as there are for alternator troubles. There are some symptoms to watch out for, however. If the starter spins freely without turning the engine, the pinion gear has not engaged the flywheel. Inspect for worn pinion gear or flywheel gear teeth, or a defective starter overrun clutch. A slow-cranking engine normally points to an electrical problem such as poor electrical contact at cable terminations, a weak solenoid, or a defective starter relay. Engines that crank noisily are usually caused by a poor mesh of pinion-to-flywheel gear teeth. Sometimes this is caused by a loosely mounted starter or worn or missing gear teeth. If the engine will not crank at all, check first for open circuits. Follow the procedure in the shop manual. Here’s a tip: If your car has a seat belt interlock system and it’s defective, the engine won’t crank.
Inspect the starter brushes every 75,000 miles. Replace as needed. Clean and polish the commutator at this time, also. At 75,000 miles, run the starter through the series of tests outlined in the shop manual. Correct any deficiencies found in the starter. For both the alternator and starter, it is important to consult the shop manual for service and tests because these components vary greatly in design from one manufacturer to another.
ELECTRONIC IGNITION
Electronic ignition systems do the same job as the breaker point ignition systems. They differ only in the way the current to the primary coil winding is switched on and off, and that they have an electronic control unit. Instead of the breaker points, most electronic ignition distributors have a magnetic pulsing system that triggers the electronic control unit to interrupt the current flow to the primary coil winding. From this point on the electronic ignition system functions exactly as the breaker point system. The coil produces a high-voltage current in the secondary winding, which flows through the ignition cable to the cap, rotor, and eventually the spark plug. Figure 9-11 is a simplified schematic of a typical electronic ignition system showing the alternator, ignition switch, coil, electronic control unit, and the distributor. The electronic control unit takes the place of the breaker points in this system.

Fig. 11. Electronic ignition system.
The electronic ignition system uses transistors to switch the current flow on and off through the primary winding of the coil instead of the mechanical breaker points. The advantages of the transistorized system are obvious. There are no moving parts to wear or adjust. There are no points that could pit or burn, and transistors can handle much higher voltage and current than breaker points. This allows use of a bigger spark across the spark plug gap, resulting in increased ignition efficiency and less plug fouling. These higher ignition voltages have made it possible for designers to lean the air-fuel mixture for better gas mileage and pollution control. And because of these higher voltages, all electronic ignition system cabling is made with insulation formulated with silicone to provide better insulating properties.
The distributor cap, the rotor, and the ignition wires are the only parts of the electronic ignition system requiring periodic maintenance. Inspect and service them in the same manner and at the same interval as in the breaker point system. Every 100,000 miles, run the electronic ignition system through the series of tests outlined in the shop manual. Replace parts out of specification, as required.
Each manufacturer uses a slightly different electronic control unit or distributor assembly. Explaining each of them is not within our scope, but as a general rule you may suspect electronic ignition problems if one of the following five conditions occur:
1. The engine will not start but turns over normally.
2. The engine backfires and will not start.
3. The engine misfires at high speed or stalls at normal speed, and then can’t be restarted.
4. The engine runs roughly at low speeds or at idle.
5. The engine runs when cold, but when hot, runs roughly or stalls.
Consult the shop manual for tests you can perform to isolate the cause of these problems. Keep in mind that heat is a killer of electronic components. Every few months check for any dirt or grease build-up on the electronic control unit that might insulate it. If cooling air cannot get to the unit, it could overheat and fail. It should be mounted away from all hot engine parts.
SUMMARY OF RECOMMENDATIONS
• Never crank a cold engine for more than 30 seconds at a time.
• Recharge the battery as you notice signs of weakening. Keep it at or above 75% charge at all times. Consider trickle charging in winter. Consider use of a battery or engine heater to help prolong battery life in winter.
• Inspect and clean battery terminals twice a year. Coat terminals with a protective jelly or grease to fight corrosion. Also inspect the battery cables at this time.
• Check battery water level every month.
• Clean the battery case once a year.
• Check, clean, and tighten all electrical connections before every tune-up or twice a year. Also inspect cable insulation at this time.
• Replace ignition cables when worn with aramid fiber, or shielded metal wire conductor cable with silicone insulation.
• Perform a cable resistance test twice a year.
• Inspect and gap spark plugs at every tune-up or twice a year. Replace spark plugs every 12,000 to 15,000 miles.
• Inspect the distributor assembly twice a year or at every tune-up. Lube all necessary parts at this time. Replace the cap and rotor every 50,000 miles.
• Run the alternator through the battery of tests, as outlined in the shop manual, every 50,000 miles. Service as required. Replace the alternator brushes every 100,000 miles or sooner, if warranted. Clean and polish the slip rings at this time.
• Check and adjust alternator belt tension every month.
• Run the starter through the battery of tests, as outlined in the shop manual, every 75,000 miles. Service as required. Replace the brushes every 100,000 miles or sooner, if warranted. Clean the commutator at this time.
• Clean the electronic control unit housing every few months. Brush clean with a dry brush only, do not use any liquid or solvent.
MECHANIC’S TIPS
• Make sure the battery hold-down bolts or bracket is in good shape and tight.
• Clean and, if necessary, paint the battery tray every year.
• Buy name brand spark plugs only. Bargain brands won’t last and won’t transmit the needed spark for best performance.
• When installing spark plugs, torque them to factory specifications. If you over-tighten them, especially in aluminum engines, you risk stripping the threads in the engine. Repair is expensive.
• Keep grease, oil, and dirt off the spark cables. Sometimes grease and dirt will cause spark crossover between adjacent wires with resultant loss of performance.
• Patch distributor cracks with special non-conductive silicone patch or replace as soon as possible to prevent loss of spark.
Prev: Mechanical Tune-Ups
Next: An Integrated Tune-Up
Home top
of page