Few experiences are as frustrating as an engine that refuses to start or that runs a few seconds and dies. One continues to crank, hoping that somehow things will fix themselves. We all do this, even those of us who should know better. If it's any consolation, porpoises exhibit the same sort of magical thinking. At a naval research facility in Maryland the animals were routinely given slight electrical shocks, which they found pleasurable. One day the generator failed and the porpoises gathered round, whistling. When the recording of their sounds was played at slow speeds, the porpoises were saying, "Testing, one, two, three." They were cranking, trying to get the gen erator started.
A two-cycle engine consists of four systems:
• Mechanical-piston, crankshaft, and connecting rod
• Ignition-spark generator and spark plug
• Fuel-carburetor, filter, and associated plumbing
• Starting-rewind starter
When something goes wrong, we must first decide upon the system involved. How to relate malfunctions to engine systems is the subject of this section. Once categorized, repairs are simple.
But understand that engines, even little two-strokes, are complicated enough to elude formula. Troubleshooting charts and logic trees oversimplify because they frame diagnostic questions in such a way that the answers can only be "Yes" or "No." In the real world answers are rarely so pat. We cannot see air leaking past a gasket or the failure of the spark plug to fire when screwed into the cylinder. But we can assume that a torn gasket leaks and that a dirty spark plug misfires under compression.
In other words, troubleshooting is a gambling game-we are guided by probabilities and wager time, parts and ego on the outcome. Odds improve with close observation, conditioned by an understanding of the importance of spark, fuel delivery, and compression.
Things to keep in mind
An engine must run if it has:
• Sufficient spark to fire the mixture at cranking speed. We can determine the presence of spark with an ignition tester but, short of laboratory instruments, we cannot measure spark voltage or energy.
• Fuel in the right amounts to support combustion. Too much fuel is as bad as too little. The condition of the spark-plug tip is our gauge of fuel delivery.
• Adequate compression. Small two-stroke engines need a minimum of 90 psi to start.
• Free-flowing exhaust. Carbon accumulations in the exhaust ports and muffler rarely prevent an engine from starting, but drastically reduce power outputs.
Tools and supplies
Two-strokes are held together with metric fasteners, star-pattern Torx screws, and an occasional Phillips or Allen screw. Quarter-inch drive sockets are adequate for everything except the flywheel nut. U.S. standard 1/2-in. wrenches fit (somewhat loosely) 13-mm bolts and 9/16-in. wrenches work for 14 mm. You will also need a spark-plug socket wrench, an ignition tester, and a compression gauge.
Because they are torque-limiting, that is, designed to slip, Phillips screws present a problem. Striking the screwdriver with a hammer sometimes helps, but the ultimate persuader is a hammer-impact wrench. Once you get the screws out, replace them with Allen or Torx fasteners.
Supplies include fresh fuel, mixed with the correct amount of two-stroke oil, solvent, aerosol carburetor cleaner, and lint-free rags. Automotive brake cleaner is a potent, but toxic, degreaser that attacks paint and some plastics.
And a word of caution: no amount of care can eliminate gasoline spills associated with draining fuel tanks and disconnecting fuel lines. Ideally, the work should be done outside. If that is impractical, the work area should be well-ventilated and remote from pilot lights and other ignition sources.
Wipe up spills promptly and allow plenty of time for traces of gasoline to evaporate before cranking the engine. Keep a fire extinguisher handy.
Another tool, often overlooked, is a notebook small enough to carry in a top pocket. Much frustration will be avoided by recording where fasteners go, which ones were treated with sealant, how fuel-system plumbing is routed, and other details that seem so obvious upon disassembly and so mysterious when it's time to put things back together.
Preliminaries
When an engine breaks down in the field, we try to zero in on the problem, fix it, and go on about our business. In a repair shop, the urgency is usually less, and we can take the time to round up the usual aspects by replacing parts most likely to have failed.
• Inspection
Check for obvious faults. These include fuel leaks, weak compression, loose carburetor, crankshaft binds, and oil stains adjacent to gasket surfaces. If working on someone else's engine, bolts that show fresh wrench marks mean repairs were attempted, probably since the engine last ran. Such abortive attempts at repair complicate matters since you must now identify the original problem and whatever the hapless mechanic might have done wrong.
• Spark plug
Begin by replacing the spark plug with a new, or known good, plug of the type recommended in the operator's manual. This action will correct 90% of engine malfunctions. Gap to specification, which for most handheld engines is 0.016 in. and for larger units 0.025 in. ( Fig. 1). A cam-type gauge gives less ambiguous readings than a conventional, flat-blade feeler gauge ( Fig. 2).
• Fuel
If there is any question about fuel quality, take the machine out doors and drain the contents of the tank into a glass container. An acrid smell, a brownish taint, or globules of water in bottom of the container mean that the fuel system has been contaminated. Flush the tank with hot water and detergent, replace the fuel filter, and overhaul the carburetor with new diaphragms, inlet needle, and gaskets as described in Section 4.
• Fuel filter
Replace the filter, using the correct factory part. "Universal" automotive filters clog quickly when used on gravity-fed small engines. Use a hooked wire to retrieve in-tank filters of the kind found on handheld equipment ( Fig. 3).
• Air filter
Most two-cycle engines use a polyurethane foam filter that should be cleaned with soapy water and lightly oiled with a proprietary lubricant. The foam filter may be backed up with a pleated paper filter, which is a sacrificial element requiring routine replacement. You may also encounter a third filter downstream of the paper element. This filter is a backstop to prevent dust entry when servicing primary filters.
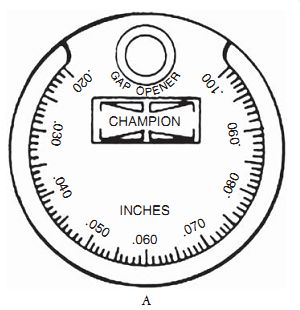
FIG. 2
A Champion taper gap gauge, available in auto parts stores or from Tecumseh as PN 670256, can be used to widen the gap (A). To reduce the clearance, tap the side electrode against a hard surface (B). Bosch

FIG. 1. Narrow spark-plug gaps are the norm for small engines. In the case
of this Wacker Neuson chainsaw, the 0.5-mm gap translates as 0.013 in.
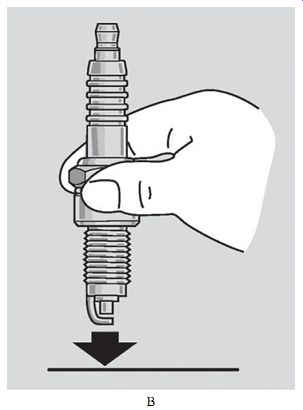
FIG. 2 (Continued)
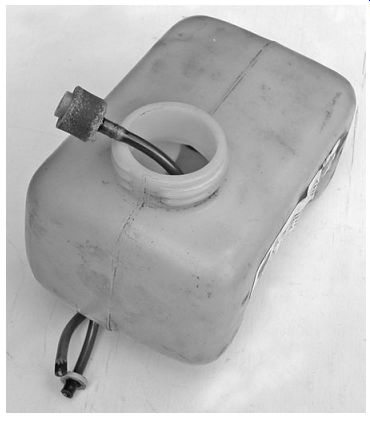
FIG. 3 In-tank filters should be changed annually and whenever the equipment
comes into the shop.
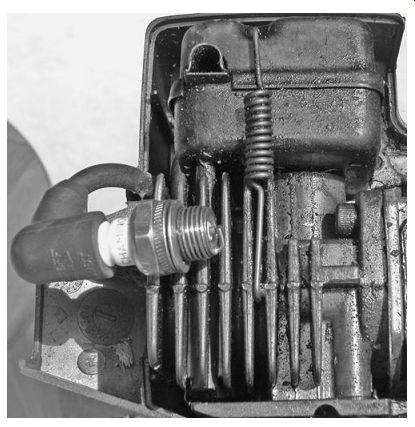
FIG. 4. This method of checking spark leaves much to be desired. Plastic
engine covers must be removed to access ground and unshielded spark presents
a fire hazard.
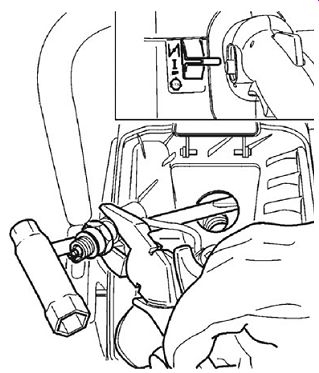
FIG. 5. With a spark-plug wrench inserted into the spark port, ground the
spark plug against the wrench. Note that the wrench handle must not extend
into the combustion chamber, if engine damage is to be avoided. The mechanic
has also taken the precaution of using insulated pliers. Wacker Neuson
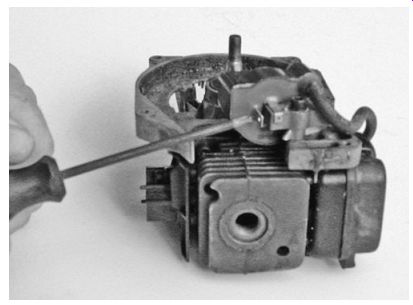
FIG. 6. The screwdriver points to connection on the ignition coil for the
kill switch.
Tests
Diagnosis begins with a series of tests and observations.
Spark output
Anyone who contemplates doing much work on small engines should invest in a Briggs & Stratton PN19053 or a STIHL Zat 4 ignition tester. These tools eliminate any fire hazard by confining the spark behind a transparent window. People with pacemakers or other medical problems should not expose themselves to electroshock. Solid-state ignition systems produce something on the order of 30 kV, open-circuit.
That said, the traditional method of verifying spark delivery is to hold the spark plug against engine metal and crank ( Fig. 4). So long as the plug makes firm contact, voltage goes to ground through the engine and not the mechanic. A variation on this technique is illustrated in Fig. 5.
The spark should occur once during every revolution, as regular as a heart beat. No spark means a
• Sheared or deformed flywheel key.
• A short in the wiring going to the kill switch or another problem with the primary circuit that sometimes includes safety interlocks, which are notoriously unreliable. Test the integrity of this circuit by cranking with the kill-switch wiring disconnected from the ignition module ( Fig. 6). Do the same for lights and other electrical components that may be present.
• Ignition module failure
Solid-state modules, which have been standard on small engines for almost 30 years, are not repairable or, for that matter, testable in any meaningful sense. Nor are electrical parts returnable after purchase. If you suspect that the module had failed, the only option is to test by substitution of a new, or known-good, unit.
• "Whiskers"
While this phenomenon is rare, it's worth mentioning. Two cycle spark plugs, even brand new spark plugs, can spontaneously develop "whiskers"-fine, hair-like growths between the side and center electrodes that short voltage to ground. In the wake of a whisker-induced ultra-light aircraft accident in England, Rotax replaced the 532 engine, which used a single spark plug per cylinder, the dual-plug 582.
An ignition tester is also useful when diagnosing engines that run for a few minutes and then shut themselves off. Connect the tester to the high-tension lead, in series with the spark plug. Start the engine and watch the spark as the engine dies and coasts to a stop. Ignition should continue until the flywheel almost stops revolving. If ignition ceases before shutdown, the ignition module has failed, probably because of heat. If ignition remains constant, then the source of the problem lies elsewhere, probably in the fuel system.
Fuel system
Fuel systems go wrong by delivering too little or too much fuel.
No fuel
Crank a cold engine five or six times and remove the spark plug.
If fuel is entering the cylinder, the tip of the spark plug will be wetted and smell of gasoline. If the plug is dry, momentarily disconnect the fuel line to the carburetor. Unless there is an obstruction upstream-tank filter, screen, or clogged line-fuel should dribble out of the open line. Repair as necessary.
When fuel is present at the carburetor inlet, the logical response is to bypass the carburetor. Remove the spark plug and spray a small amount of carburetor cleaner into the cylinder. Reinstall the spark plug and crank. If the engine does not start, the problem is almost certainly the spark plug or ignition module. If it starts and runs a few seconds, we can assume that fuel starvation is the problem. Some malfunction prevents fuel from passing through the carburetor and into the combustion chamber.
To further isolate the problem, remove the air-filter element and spray carburetor cleaner into the air horn. Replace the filter.
Warning: Do not run an engine without the air-filter in place.
If the engine runs until the aerosol is consumed, we can be confident that things downstream of the carburetor are normal. That is, the reed valve functions and the piston seals well enough to draw fuel into the crankcase. If the crankcase seals leak, the leak does not inhibit starting. Since we have already verified that fuel is available to the carburetor, the problem must be in the carburetor itself.
Section 4 describes how to make the necessary repairs.
Too much fuel Flooding a cold engine soaks the spark plug with raw fuel and, in more extreme cases, sends fuel dribbling out the carburetor air horn.
Flooding can be induced by heroic cranking, but more often is the fault of the carburetor. Float-type carburetors flood because of dirt between the inlet needle and seat or because of a hung float. Diaphragm carburetors are less prone to flooding, but will do so if the inlet needle sticks in the open position.
Flooding in a hot engine is more difficult to detect, since the fuel vaporizes.
Sometimes you can see a curl of vapor leave the spark-plug port as the plug is removed. In many cases, hot flooding comes about because of heroic cranking or because the choke was left engaged. If the problem persists when the engine has cooled down, assume that the carburetor is at fault.
Lean mixtures
Lean mixtures are a cause for alarm. The operator might notice flat spots during acceleration or that the engine runs better with a partially closed choke. A mechanic will see the bleached, bone-white spark plug insulator ( Fig. 7) and immediately suspect piston damage of the sort pictured in Fig. 8. In extreme cases, high combustion temperatures melt the piston crown.
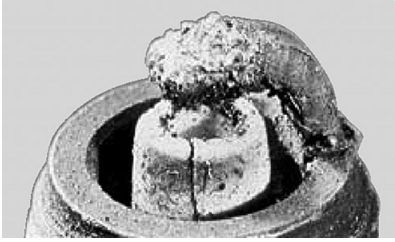
FIG. 7. A white insulator tip is the first symptom of overheating, almost
always caused by lean mixtures. Too much ignition advance on engines with adjustable
timing has the same effect. The damage shown in the photo comes about when
overheating results in detonation or preignition. U.S. Bosch
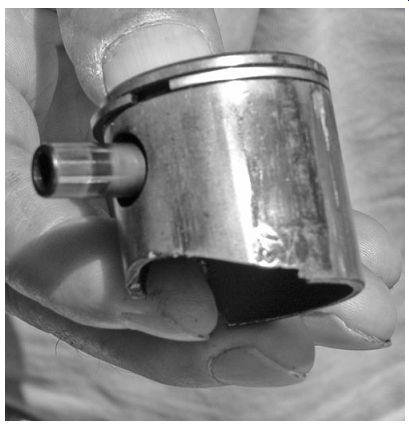
FIG. 8. High combustion temperatures are death on pistons. This example exhibits
pock marks left by metal fragments, deep scores, and, near the crown on the
right of the photo, weld splotches.
Lean mixtures are attributable to:
• Carburetor malfunctions (Section 4)
• Leaking crankshaft seals (Section 6)
• Leaks at the carburetor flange, ( Fig. 9)

FIG. 9. Carburetors often vibrate loose from their mounts and leak air.
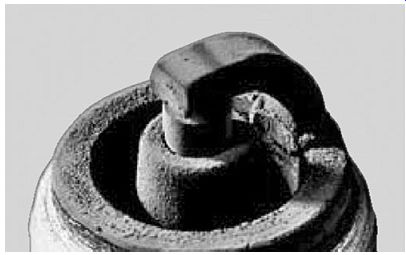
FIG. 10. The darker the color of the insulator, the richer the mixture.
Rich mixtures Black, furry deposits that you can wipe off with your fingers are evidence of rich combustion ( Fig. 10). The engine is drowning in gasoline. Suspect a maladjusted carburetor and/or a dirty air filter. Unlike lean mixtures, gasoline-rich mixtures do no permanent damage, at least on engines without catalytic converters.
It is also true that chronic misfiring darkens the spark plug. A replacement plug usually solves the problem.
Compression
Two-cycle engines develop two kinds of compression: crank case and cylinder. Weak crankcase compression reveals itself as a refusal to ingest carburetor cleaner sprayed into the air intake. Some mechanics claim to be able to sense the crankcase pressure, which never amounts to more than 5 or 6 psi, as resistance on starter cord. The rest of us test crankcase integrity as described in Section 6.
Cylinder compression is another matter and should be checked whenever an engine enters the shop. Vintage engines-West Bends, Clintons, Power Products, Villiers-could sometimes be persuaded to start with as little as 60 psi of cylinder pressure. Modern engines require 90 psi or more.

FIG. 11. Cylinder compression is a basic indication of engine health.
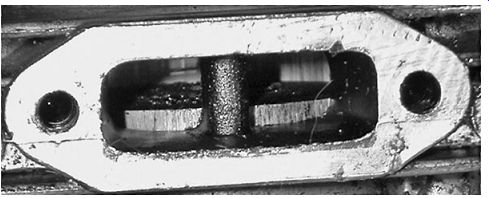
FIG. 12. What one hopes not to see when peering through the exhaust port.
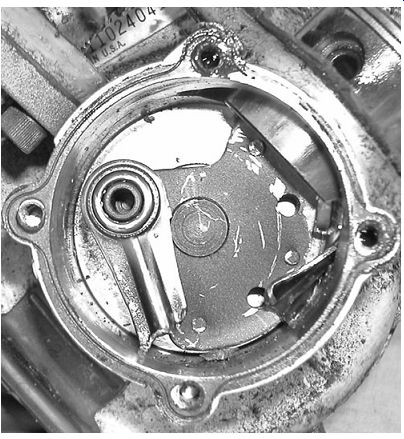
FIG. 13. A parted rod, resulting from big-end bearing failure.
Thread a compression gauge in the spark-plug port, open the throttle and choke, and crank three times ( Fig. 11). If compression is a problem, remove the muffler and, using a soft probe, verify if the rings move in and out of their grooves. Two-cycle rings are pegged to pre vent rotation, but should move inward a few thousandths of an inch and spring back when pressure on them is relieved. Stuck or broken rings cannot seal.
Now rotate the flywheel to bring the piston below the exhaust port. Using a penlight, examine the far cylinder wall for scores. Any scoring costs compression. Raise the piston above the port. Scores, weld splotches, or extensive discoloration of the piston skirt are fatal ( Fig. 12).
Piston damage, which nearly always involves collateral damage to the cylinder, may signal that it's time to fold. Factory short blocks, that is, new rotating parts installed in new cylinder and crankcase castings, usually cost more than the engine is worth.
When the engine spins freely without any resistance on the starter cord, we have zero compression. This condition can be caused by a holed piston or, as more often is the case, by a thrown rod ( Fig. 13). Repair is rarely worthwhile.
Backpressure
Although "backpressure" is a misnomer, the term describes what happens when the plumbing clogs with carbon. The engine chokes on its own exhaust.
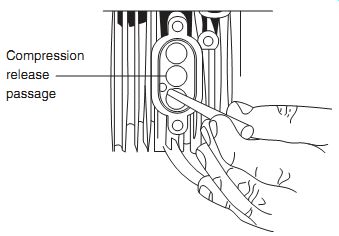
FIG. 14. Some Tecumseh engines have a compression-release port, which also
requires cleaning.

FIG. 15. Most handheld and agricultural engines include a spark arrestor
similar to the STIHL unit shown. Clean the screen in solvent, being careful
not to damage the fragile mesh. Torn screens should be replaced.
Lower the piston and, using a soft brass or copper tool, scrape the exhaust ports clean ( Fig. 14). Clear the cylinder of carbon fragments by spinning the flywheel rapidly with the spark plug removed.
Chain saws and many garden tools incorporate a spark arrestor in the form of a screen over the exhaust ports or inside the muffler ( Fig. 15). Gently clean the screen with a brass wire brush. Non-catalytic mufflers can be cleaned by immersion for an hour or so in hot water and caustic soda. Clogged catalytic converters must be replaced.
Complaints
Now that we have an appreciation of what engines require, complaints about engine behavior are not difficult to resolve.
No start Failure to start with a new spark plug, fuel filter, and a quarter tank of fresh premix can have several causes, most of them obvious. We can pretty well forget about carburetor adjustments (unless someone has jiggered with the carburetor since the engine ran last), carbonized exhaust ports, and other subtleties.
Check ignition output as described under "Spark Output" earlier. No spark usually means a failed flywheel key, although the wire going to the kill switch should be checked for frayed insulation or burnt spots.
Crank the engine to determine if fuel gets into the cylinder. To verify, spray aerosol carburetor cleaner into the cylinder and carburetor intake, as described under "No fuel" earlier. If the engine runs on aerosol, but not on gasoline, we can be confident that the problem is in the fuel system. Likely culprits are a dirty carburetor, hardened or leaking diaphragms, or a fuel pump malfunction. These and other fuel system malfunctions are detailed in Section 4.
And finally make a compression test, looking to find that magic 90-psi number.
Reluctance to start
That the engine starts at all means that compression and the ignition module are probably okay. But check the compression and, if you have not already done so, replace the spark plug with a known good one. The most likely culprit is insufficient fuel, especially if the engine is of recent vintage. Clean and use whatever carburetor adjustments are available to richen the mixture.
In some cases, the only recourse is to fit an earlier model, fully adjustable carburetor.
Runs a few minutes and quits
Intermittent malfunctions are, almost without exception, confined to the ignition and fuel systems. Test ignition output with the engine running is described under "Spark Output." If spark persists during coastdown, the problem lies in the fuel system. Suspect a clogged fuel-tank vent ( Fig. 16) or a sticking carburetor inlet needle.
Lack of power
Our perceptions of power are subjective. When the complaint is real, the first priority is to distinguish between the engine and what it drives. The fault may be a dull saw chain, an oil-soaked centrifugal clutch, dragging bearings, or an over-tightened belt.
If power loss is the fault of the engine, the condition usually develops over time, due to the slow degradation of all systems. About all one can do is to rebuild the carburetor, install new rings, and verify that the exhaust system flows freely. A slightly richer than normal mixture may help.
Refusal to idle or to run at high speed
These carburetor-related problems are discussed in Section 4.
Flywheel binds
Disconnect the engine from its driven element and retest. If the flywheel continues to bind, the problem is serious. See Section 6 for repair instructions.
Rewind starter fails to engage
See Section 5.

FIG. 16. Fuel-tank vents for handheld engines can be fairly complicated,
as shown on this Tanaka unit. Some mechanics ignore the very real fire hazard
and check vent operation by running the engine with the cap loose.
Prev. | Next
Home Article
index top
of page